
In the world of home improvement and interior design, there are projects that stand out not only for their transformation but also for the joy they bring during the process. The large, vibrant mural we recently crafted in our daughter’s room falls squarely into this category. It was a journey filled with careful pre – planning, a touch of spontaneous creativity, and best of all, it was a project that was both accessible and budget – friendly.
The Vision Takes Shape
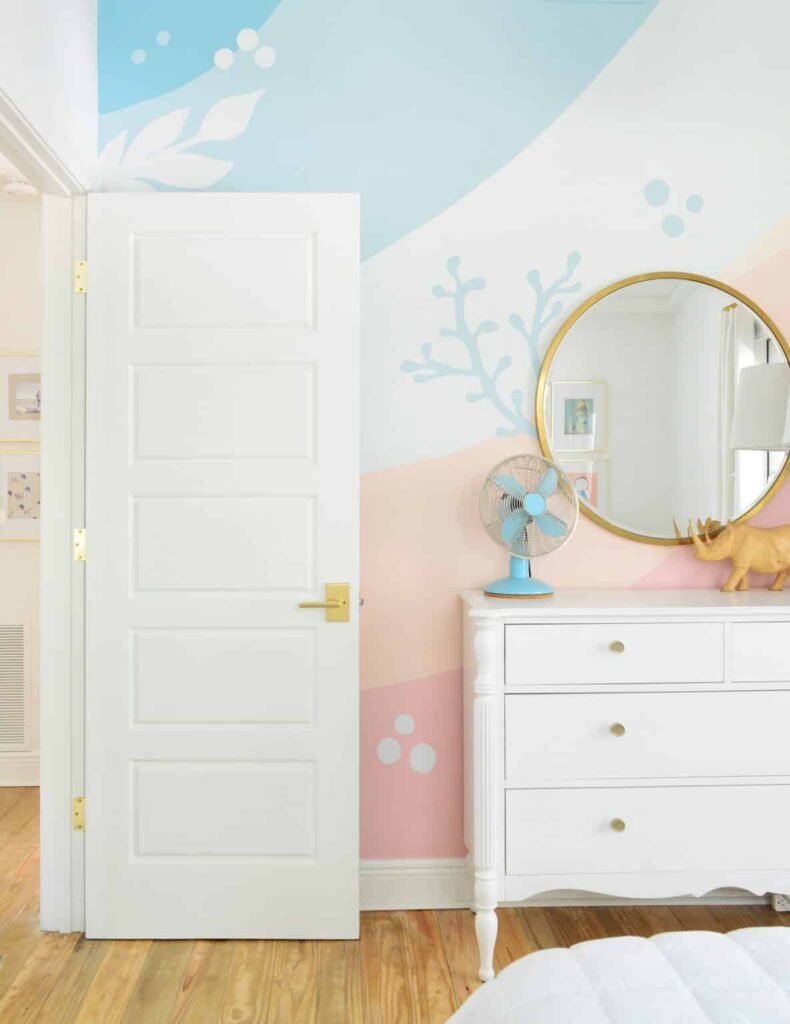
The idea of painting a mural in our daughter’s room had been simmering in our minds for a while. We wanted to create a space that was uniquely hers, a haven filled with color and imagination. The result? A stunning, hand – painted masterpiece that has become the focal point of her room. What’s remarkable is that we achieved this without any high – tech gadgets like paint sprayers or projectors. In fact, we didn’t even use painter’s tape! This mural was a labor of love, created with nothing more than regular paintbrushes and rollers.
The Materials: A Simple Arsenal
The materials needed for this project were as uncomplicated as the process itself. If you’ve ever taken on the task of painting a room, you’ll find the list quite familiar. We gathered quarts or test pot cans of various paint colors, carefully selected to bring our vision to life. Short – handled paintbrushes were our go – to for the intricate details, while 4″ or 6″ foam rollers helped us cover larger areas quickly. We also had roller trays or roller tray liners to hold the paint, and Ziploc bags to store our brushes and rollers between uses. A drop cloth protected the floor from any paint splatters, and a pencil, measuring tape, ladder or stepstool, and an optional ruler completed our toolkit. It’s worth noting that having one set of these items for each paint color made the process smoother, allowing us to keep each color’s tools at the ready until the mural was finished.
The Process: Step by Step
Step 1: Selecting the Perfect Canvas
The first step in our mural – making adventure was choosing the right wall. As part of a recent renovation, we had vaulted the ceilings in our daughter’s room. This not only made the space feel more expansive and bright but also presented us with a large, blank 10 – foot tall wall on one side of the room. It was the perfect canvas for our colorful creation.
Step 2: Planning the Design
Before dipping our brushes into the paint, we spent some time planning the design. We considered our daughter’s interests and the overall theme we wanted to convey. In this case, we went for a beachy, abstract look with elements like coral and seaweed. We used a pencil and measuring tape to lightly sketch out the basic layout on the wall. This gave us a guide to follow as we painted, but also allowed for some flexibility in case we wanted to make changes along the way.
Step 3: Painting Begins
With our plan in place, it was time to start painting. We began with the base colors, using the foam rollers to cover the larger areas. This was a relatively quick process, but we had to be patient and wait for each section to dry before moving on. Once the base was done, we switched to the paintbrushes for the more detailed work. We added the coral shapes, the seaweed strands, and other decorative elements, layer by layer. The kids even got in on the action, grabbing their own paintbrushes and adding their unique touches.
Step 4: Embracing Imperfection
One of the most liberating aspects of this project was realizing that you really can’t go wrong. Since it was an abstract mural, there was no right or wrong way to paint it. If a line wasn’t perfectly straight or a color blend wasn’t exactly as planned, it just added to the charm. Each “imperfection” made the mural more unique and personal.
In total, the mural took about 5 hours of actual painting time, but was spread over 2.5 days due to the drying time between layers. The end result was more than worth the effort. The wall, once plain and unremarkable, now bursts with color and life. It has transformed our daughter’s room into a magical space that she loves spending time in. So, if you’ve ever considered adding a mural to your home, don’t be afraid to give it a try. With a little planning and a lot of creativity, you can create a work of art that will be cherished for years to come. What kind of mural design are you thinking of for your home?

